Sharing Documents Using SharePoint Team Services
After you have documents stored on a team site, you (and other members of the team site) can download and check out the documents for sharing purposes. Checking out a document is much like reserving a book at the library. You're marking the document as available only for you. Others can still view and edit the document; however, they will be working with the original copy of the document, rather than the checked-out copy. The following example illustrates the process of checking out and checking in a document.
Laura is the author of a Network Infrastructure Upgrade Agenda document. After creating the document, she uploads it to the local team site for viewing by all the members of her team. Two hours after she posts the document, she realizes that she forgot to add the Web site links she wants her team to review before the meeting. So Laura visits the team site and checks out the document. After the document is checked out, she opens the document for editing in Microsoft Office Word. In the middle of making her changes, Laura is called away to a meeting. She leaves the document open on her computer without checking the document back in to the team site.
Meanwhile, David decides to take a look at the agenda for tomorrow's meeting. He visits the team site and opens the document library. David can open the document for editing by simply choosing Edit with Microsoft Office Word from the document's drop-down menu. When David chooses to open the document, he's informed that the document has been locked for editing by Laura. He can open a read-only copy, or choose to open a local copy and save his changes locally. After David makes his changes, he saves the document to his local computer. Later, when Laura has checked in the document, David can choose to merge his changes with Laura's checked-in copy.
When Laura returns to her office after her meeting, she completes her changes to the document, saves it, and checks it back in to the team site. The next time David tries to open the local copy of the agenda, Word informs him that he is now able to access the server copy of the document. He chooses to merge his changes with the copy stored on the team site.
The next time Laura visits the team site, she takes a quick look at the Version History for the document. She hovers her mouse over the document name and chooses Version History to display the screen shown in Figure 27.18.
Figure 27.18. You can view multiple versions of the same file with version control enabled.
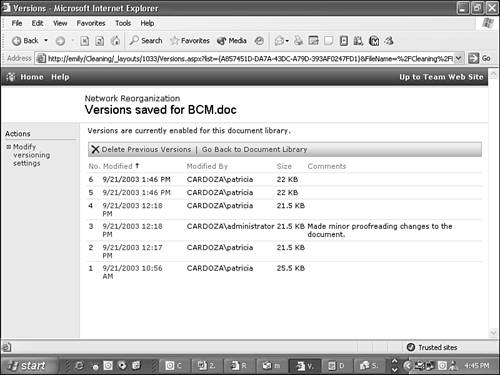
Hovering her mouse over each version allows Laura to choose three options from the version drop-down menu. Laura can view the version, delete the version, or restore it to the document library. The one function Laura can't perform is combining the versions.
The Importance of Versions
So if anyone can make changes to a document and combine their changes into the main document, why is versioning important? Well, whenever you have a document edited by multiple people, you have the possibility that someone will enter erroneous information or overwrite someone else's changes. Turning on version control can help an administrator recover previously saved changes to a document if necessary. Whenever a user checks a document back in, he can add comments to the checked-in version. This can provide an administrator with the information she needs to adequately understand which versions should be kept and which should be discarded.
Receiving Alerts When Documents Change
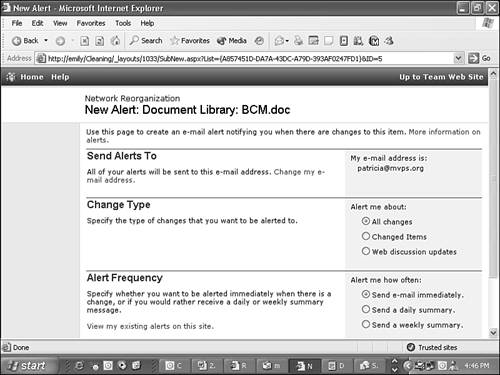
SharePoint Team Services has the capability to notify users when a document has changed. To receive an alert whenever a specific document changes, navigate to the Document Library. Hover your mouse over the document's name, and click the drop-down box that appears around the document's name. Choose Alert Me from the drop-down menu to display the screen shown in Figure 27.19.
Figure 27.19. You can configure SharePoint to alert you whenever a document changes.
You can configure various settings to personalize your alert:
Send Alerts To? You can have your team site alert you at any email address when a document changes. The email address you choose doesn't have to be the address you used to subscribe to the site, nor the one stored in Active Directory. Click Change My E-mail Address to specify a new email address.
Change Type? Use this section to choose the types of changes you want to be notified about. You can select All Changes, Changed Items, or Web Discussion Updates.
Alert Frequency? You can choose how often you want your SharePoint site to notify you of changes. You might not want to be informed of every change immediately when it happens. You can choose to get an immediate notification, a daily summary notification, or a weekly summary notification.
When you're done making changes to your alert settings, click OK to return to the Document Library.
Creating a Document Discussion
One of the strengths of SharePoint Team Services is that it can be used to provide collaboration features such as document discussion. Multiple users of a team site can "meet" to discuss a document over the Internet. To open a discussion on a document from the Document Library, choose Discuss from the document's drop-down menu. In response to the prompt to open or save the file, choose Open to display the screen shown in Figure 27.20.
Figure 27.20. Multiple users can discuss a file over the Internet.
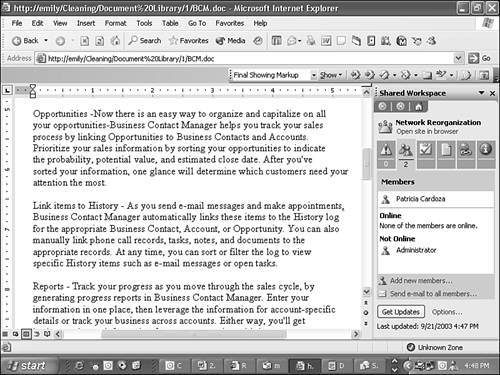
Multiple users can make changes to the documents or add new discussion topics. Use the discussion toolbar at the bottom of the document to add a new discussion to the document. When another user adds a discussion element, you won't see the element right away. You might need to refresh the discussions first. To do this, click the Discussions button at the bottom of the document and choose Refresh Discussions. You can also filter discussions and configure discussion options from this pop-up box.
After several discussions have been initiated about the document, your document might look similar to the one in Figure 27.21.
Figure 27.21. Multiple users can discuss many aspects of the document.
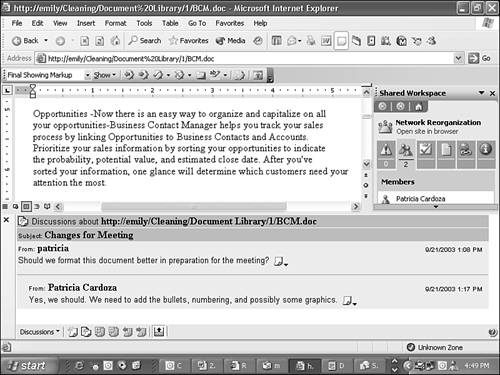
When you're done with a particular discussion, you can mark the discussion as closed. This removes the discussion from active view, yet leaves it as part of the document.
When you're done discussing the document, close the document. You won't be able to save your changes to the document on the team site; the document will be marked as read-only. This prevents multiple users from uploading changed versions simultaneously to the same location. You can, however, save changes to the document on your local computer and then upload the changed document back to the team site later.
Creating a Document Workspace
In addition to uploading documents to a workspace, you can take an existing document and create a new document workspace. This workspace contains a copy of the original document and is designed to allow you to go into further discussion about the document without detracting from the purpose of the original team site. For example, you might create a team site for your Network Infrastructure Upgrade project that contains 10 documents. However, one of those documents is a proposal for the next phase of the project, the Network Software Upgrade project. Because this isn't even a project yet, but merely a proposal, you don't want to create a team site for the project. Because it will be a separate project with a different team and different objectives, you don't want to use your original team site for this new project either. So you can create a new document workspace for the Network Software Upgrade proposal. To create a new document workspace, click the drop-down arrow around the document's name and choose Create Document Workspace. Click OK to create your document workspace. When SharePoint has created your workspace, it will display it in a new window, as shown in Figure 27.22.
Figure 27.22. You can create a new document workspace from an existing document on a team site.
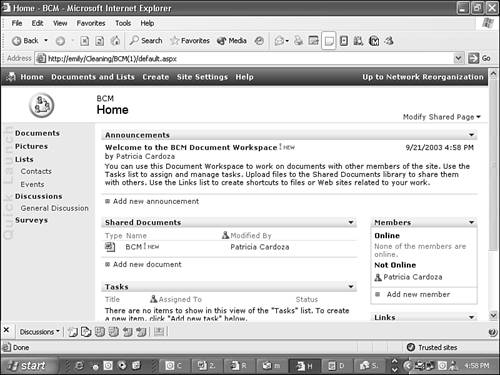
This document workspace contains shared documents, tasks, members, and links. Any changes you make to the document from this workspace remain separate from the original document in the original team site. You can work with this copy of the document in all the ways previously described in this chapter. You can manage alerts, check the document in or out, and discuss the document with users of your site. However, there's one more option you can use from your new document workspace. Clicking the drop-down box that appears around the document name allows you to choose to publish the document back to its source location. In this case, the source location is the original team site you used to create the new document workspace.


