Managing links
Managing links
To avoid broken links in your site, you can activate link management so that Dreamweaver updates links automatically when you make a change. You can also use a visual representation of your site to modify links or you can update all links to a particular file with one change.
Related topics
- Updating links automatically
- Modifying links in the site map
- Changing a link sitewide
Updating links automatically
Dreamweaver can update links to and from a document whenever you move or rename the document within a local site. This feature works best when you store your entire site (or an entire self-contained section of it) on your local disk. Dreamweaver does not change files in the remote folder until you put the local files on or check them in to the remote server.
To make the updating process faster, Dreamweaver can create a cache file in which to store information about all the links in your local folder. The cache file updates invisibly as you add, change, or delete links to files on your local site.
To enable link management in Dreamweaver:
- Select Edit > Preferences (Windows) or Dreamweaver > Preferences (Macintosh).
The Preferences dialog box appears.
- Select General from the category list on the left.
The General preferences options appear.
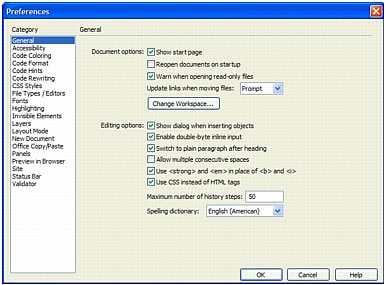
- In the Document Options section, select Always or Prompt from the Update Links when Moving Files pop-up menu.
If you select Always, Dreamweaver automatically updates all links to and from a selected document whenever you move or rename it. (For specific instructions on what to do when you delete a file, see Changing a link sitewide.)
If you select Prompt, Dreamweaver first displays a dialog box that lists all the files affected by the change. Click Update to update the links in these files, or click Don’t Update to leave the files unchanged.
- Click OK.
To create a cache file for your site:
- Select Site > Manage Sites.
The Edit Sites dialog box appears.
- Select a site, and then click Edit.
The Site Definition dialog box appears.
- Click the Advanced tab to display the Advanced category of the Site Definition dialog box.
- Select Local Info from the category list on the left.
The Site Definition dialog box displays the Local Info options.
- In the Local Info category, select the Enable Cache checkbox.
The first time you change or delete links to files in your local folder after starting Dreamweaver, Dreamweaver prompts you to load the cache. If you click Yes, the cache loads and Dreamweaver updates all the links to the file you just changed. If you click No, the change is noted in the cache, but the cache does not load, and Dreamweaver does not update links.
It may take a few minutes for the cache to load on larger sites; most of this time is spent comparing the time stamps of the files on the local site with the time stamps recorded in the cache to see if the cache is out of date. If you have not changed any files outside Dreamweaver, you can safely click the Stop button when it appears.
To recreate the cache for your site:
- In the Files panel, select Site > Advanced > Recreate Site Cache.
Modifying links in the site map
You can modify the structure of the site in the site map by adding, changing, and removing links. Dreamweaver automatically updates the site map to display the changes to the site.
To change a link:
- In the site map, select a page to which you want to change the link (so that the document that currently links to this page will point to another page), and then do one of the following:
- Select Site > Change Link (Windows) or Site > Site Map View > Change Link (Macintosh).
NOTE
Use the Files panel’s Site menu.
- Right-click (Windows) or Control-click (Macintosh), and select Change Link from the context menu.
- Select Site > Change Link (Windows) or Site > Site Map View > Change Link (Macintosh).
- Browse to the file you want the link to point to or type a URL.
- Click OK.
To remove a link:
- Select the page in the site map.
- Do one of the following:
- Select Site > Remove Link (Windows) or Site > Site Map View > Remove Link (Macintosh).
NOTE
Use the Files panel’s Site menu.
- Right-click (Windows) or Control-click (Macintosh), and select Remove Link from the context menu.
- Select Site > Remove Link (Windows) or Site > Site Map View > Remove Link (Macintosh).
Removing a link does not delete the file, but removes the link from the HTML source on the page that is pointing to the link.
To open the source of a link:
- Select a file in the site map.
- Do one of the following:
- Select Site > Open Source of Link (Windows) or Site > Site Map View > Open Source of Link (Macintosh).
- Right-click (Windows) or Control-click (Macintosh), and select Open Source of Link from the context menu.
The Property inspector and the source file containing the link open in the Document window, with the link highlighted.
Related topics
- Linking files and documents
- Working with a visual map of your site
 |  |


