Using spacer images
Using spacer images
To require a column to be a certain minimum width, you can insert a spacer image into that column. For more information, see Spacer images. You can remove spacer images from a single column or from the entire table.
The first time you insert a spacer image, you set up a spacer image for the site. You can set preferences for spacer images (see Setting preferences for Layout mode).
To insert a spacer image into a column:
- Click the column header menu, then select Add Spacer Image.
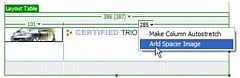
If you have not set a spacer image for this site, the Choose Spacer Image dialog box appears.
- If the Choose Spacer Image dialog box appears, select an option, then click OK.
For more information, see Setting the Choose Spacer Image dialog box options.
Dreamweaver inserts the spacer image into the column. The image is not visible, but the column might shift slightly and a double bar appears at the top or bottom of the column to indicate that it contains a spacer image.
To remove a spacer image from a single column:
- Click the column header menu, then select Remove Spacer Image.
Dreamweaver removes the spacer image. The column might shift.
To remove all spacer images from a table, do one of the following:
- Click the table header menu, then select Remove All Spacer Images.
- Select the table, then click the Remove All Spacers button in the Property inspector (Window > Properties).

The layout of your whole table might shift. If there is no content in some columns, the columns might disappear completely from the Design view.
 |  |


