Finding and displaying the requested record on the detail page (ColdFusion)
Finding and displaying the requested record on the detail page (ColdFusion)
After completing the master page (see Creating a URL parameter for the links (ColdFusion)), switch to the detail page. You must find the requested record in the database and display it on the page. The procedure consists of defining a recordset to hold a single record--the record requested by the master page--and binding the recordset columns to the page.
To find and display the requested record on the detail page:
- Switch to the detail page.
If you don’t have a detail page yet, create a blank ColdFusion page (File > New).
- In the Bindings panel (Window > Bindings), click the Plus (+) button and select Recordset (Query) from the pop-up menu.
The simple Recordset dialog box appears. If the advanced Recordset dialog box appears instead, click Simple to switch to the simple Recordset dialog box.
- Name the recordset, then select a ColdFusion data source and the database table that will provide data to your recordset.
- In the Columns area, select the table columns to include in the recordset.
The recordset can be identical to or different from the recordset on the master page. Usually a detail page recordset has more columns to display more detail.
If the recordsets are different, make sure the recordset on the detail page contains at least one column in common with the recordset on the master page. The common column is usually the record ID column, but it can also be the join field of related tables.
To include only some of the table’s columns in the recordset, click Selected and choose the desired columns by Control-clicking (Windows) or Command-clicking (Macintosh) them in the list.
- Complete the Filter section as follows to find and display the record specified in the URL parameter passed by the master page:
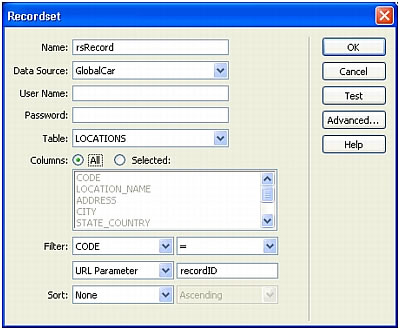
- From the first pop-up menu in the Filter area, select the column in the recordset containing values that match the value of the URL parameter passed by the master page. For example, if the URL parameter contains a record ID number, select the column containing record ID numbers. In the example discussed in the previous section, the recordset column called CODE contains the values that match the value of the URL parameter passed by the master page.
- From the pop-up menu beside the first menu, select the equal sign (it should already be selected).
- From the third pop-up menu, select URL Parameter.
The master page uses a URL parameter to pass information to the detail page.
- In the fourth text box, enter the name of the URL parameter passed by the master page. For example, if the URL that the master page used to open the detail page included the suffix locationDetail.cfm?recordID=CBR, then enter recordID.
The Recordset dialog box should look similar to the following:
- Click OK.
The recordset appears in the Bindings panel.
- Bind the recordset columns to the detail page by selecting the columns in the Bindings panel (Window > Bindings) and dragging them onto the page.
For more information, seeMaking text dynamic.
After uploading both the master and detail pages to the server, you can open the master page in a browser. After clicking a detail link on the master page, the detail page opens with more information about the selected record.
 |  |


