Creating a navigation bar using the Recordset Navigation Bar server behavior
Creating a navigation bar using the Recordset Navigation Bar server behavior
You can create a recordset navigation bar in a single operation using the Recordset Navigation Bar server behavior. The server object adds the following building blocks to the page:
- An HTML table with either text or image links
- A set of "Move to" server behaviors
- A set of "Show Region" server behaviors
The text version of the Recordset Navigation Bar looks like this:

The image version of the Recordset Navigation Bar looks like this:

Before placing the navigation bar on the page, make sure the page contains a recordset to navigate and a page layout in which to display the records.
After placing the navigation bar on the page, you can use the Dreamweaver design tools to customize the bar to your liking. You can also edit the "Move to" and "Show Region" server behaviors by double-clicking them in the Server Behaviors panel.
If you want to build the navigation bar block by block using the Dreamweaver design tools and the Server Behaviors panel, see Creating a custom recordset navigation bar.
To create the recordset navigation bar with the server object:
- In Design view, place the insertion point at the location on the page where you want the navigation bar to appear.
- Display the Recordset Navigation Bar dialog box (Insert > Application Objects > Recordset Navigation Bar).
The Insert Recordset Navigation Bar dialog box appears.
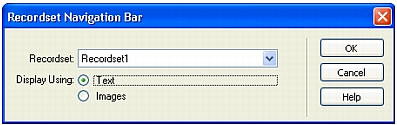
- Select the recordset you want to navigate from the Recordset pop-up menu.
- From the Display Using section, select the format to display the navigation links on the page. The Text option places text links on the page, while the Images option lets you use graphical images as links.
In the image version of the navigation bar, Dreamweaver uses its own image files. You can replace these images with image files of your own after placing the bar on the page.
- Click OK.
Dreamweaver creates a table that contains text or image links that allow the user to navigate through the selected recordset when clicked. When the first record in the recordset is displayed, the First and Previous links or images are hidden. When the last record in the recordset is displayed, the Next and Last links or images are hidden.
You can customize the layout of the navigation bar using the Dreamweaver design tools.
Related topics
- Creating a custom recordset navigation bar
 |  |


