Creating a connection using a local DSN
Creating a connection using a local DSN
You can use a locally defined DSN to create a database connection in Dreamweaver. If you want to use a local DSN, the DSN must be defined on the Windows computer running Dreamweaver.
To create a database connection with a locally defined DSN:
- Define a DSN on the Windows computer running Dreamweaver.
For instructions, see the following articles on the Microsoft website:
- If the computer runs Windows 2000, see Microsoft Knowledge Base Article 300596 at http://support.microsoft.com/default.aspx?scid=kb;en-us;300596
- If the computer runs Windows XP, see Microsoft Knowledge Base Article 305599 at http://support.microsoft.com/default.aspx?scid=kb;en-us;305599
- Open an ASP page in Dreamweaver, then open the Databases panel (Window > Databases).
Dreamweaver displays all the connections defined for the site.
- Click the Plus (+) button on the panel and select Data Source Name (DSN) from the pop-up menu.
The Data Source Name (DSN) dialog box appears.
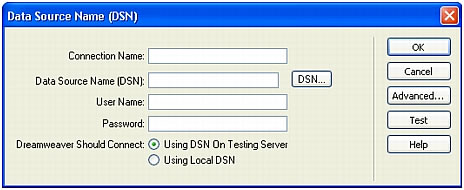
- Enter a name for the new connection.
NOTE
Do not use any spaces or special characters in the name.
- Select the Using Local DSN option at the bottom of the dialog box.
- Select the DSN you want to use from the Data Source Name (DSN) pop-up menu.
If you want to use a local DSN but haven’t defined one yet, click Define to open the Windows ODBC Data Source Administrator. For instructions, see Creating a DSN connection.
- If required, complete the User Name and Password text boxes.
- If you want, restrict the number of database items Dreamweaver retrieves at design time by clicking Advanced, and entering a schema or catalog name.
For more information, see Restricting database information displayed in Dreamweaver.
NOTE
You cannot create a schema or catalog in Microsoft Access.
- Click Test.
Dreamweaver attempts to connect to the database. If the connection fails, double-check the DSN. If the connection still fails, check the settings for the folder Dreamweaver uses to process dynamic pages (see Specifying where dynamic pages can be processed).
- Click OK.
The new connection appears in the Databases panel.
Related topics
- Creating a connection using a remote DSN
- Creating a DSN-less connection
- Troubleshooting Database Connections
Creating a connection using a remote DSN
You can use a DSN defined on a remote computer to create a database connection in Dreamweaver. If you want to use a remote DSN, the DSN must be defined on the Windows computer running your application server (probably IIS).
To create a database connection with a remotely defined DSN:
- Define a DSN on the remote system running your application server.
For instructions, see the following articles on the Microsoft website:
- If the remote computer runs Windows 2000, see Microsoft Knowledge Base Article 300596 at http://support.microsoft.com/default.aspx?scid=kb;en-us;300596
- If the remote computer runs Windows XP, see Microsoft Knowledge Base Article 305599 at http://support.microsoft.com/default.aspx?scid=kb;en-us;305599
- Open an ASP page in Dreamweaver, then open the Databases panel (Window > Databases).
Dreamweaver displays all the connections defined for the site.
- Click the Plus (+) button on the panel and select Data Source Name (DSN) from the pop-up menu.
The Data Source Name (DSN) dialog box appears.
- Enter a name for the new connection.
NOTE
Do not use any spaces or special characters in the name.
- Select the Using DSN on Testing Server option at the bottom of the dialog box.
Macintosh users can ignore this step because all database connections use DSNs on the application server.
- Enter the DSN.
You can click the DSN button to connect to the server and select from the DSNs defined on it. For more information, see Setting the Select ODBC DSN dialog box options.
- If required, complete the User Name and Password text boxes.
- If you want, restrict the number of database items Dreamweaver retrieves at design time by clicking Advanced and entering a schema or catalog name.
For more information, see Restricting database information displayed in Dreamweaver.
NOTE
You cannot create a schema or catalog in Microsoft Access.
- Click Test.
Dreamweaver attempts to connect to the database. If the connection fails, double-check the DSN. If the connection still fails, check the settings for the folder Dreamweaver uses to process dynamic pages (see Specifying where dynamic pages can be processed).
- Click OK.
The new connection appears in the Databases panel.
Related topics
- Creating a connection using a local DSN
- Creating a DSN-less connection
- Troubleshooting Database Connections
 |  |


