Displaying the record on the confirmation page (ASP.NET)
Displaying the record on the confirmation page (ASP.NET)
After completing the page listing the records (see Creating delete links on the search page (ASP.NET)), switch to the delete confirmation page. The confirmation page shows the record and asks the user if they’re sure they want to delete it. When the user confirms the operation by clicking the form button, the web application deletes the record from the database.
Building this page consists of the following tasks:
- Creating an HTML form with a button to click to confirm the deletion
- Retrieving the record to display on the page
- Displaying the record on the page
Retrieving and displaying the record consists of defining a DataSet to hold a single record--the record the user wants to delete--and binding the DataSet columns to the page. The steps are outlined in more detail below.
To create an HTML form to confirm the deletion:
- Create a new ASP.NET page and save it as the confirmation page you specified in the previous section.
You specified a confirmation page when you created the Delete links in the previous section. Use this name when saving the file for the first time (for example, locationDelete.aspx).
- Insert an HTML form on the page (Insert > Form > Form).
- Add a hidden form field to the form.
The hidden form field is required to store the record ID passed by the URL parameter. To add a hidden field, place the insertion point in the form and select Insert > Form > Hidden Field.
- Add a button to the form.
The user will click the button to confirm and delete the displayed record. To add a button, place the insertion point in the form and select Insert > Form > Button.
- Enhance the design of the page as desired and save it.
To retrieve the record the user wants to delete:
- In the Bindings panel (Window > Bindings), click the Plus (+) button and select DataSet from the pop-up menu.
The simple DataSet dialog box appears. If the advanced DataSet dialog box appears instead, click Simple to switch to the simple DataSet dialog box.
- Name the DataSet, and then select the database table that contains the records that could be displayed.
- In the Columns area, select the table columns (record fields) you want to display on the page.
To display only some of the record’s fields, click Selected and select the desired fields by Control-clicking (Windows) or Command-clicking (Macintosh) them in the list.
Make sure to include the record ID field even if you won’t be displaying it.
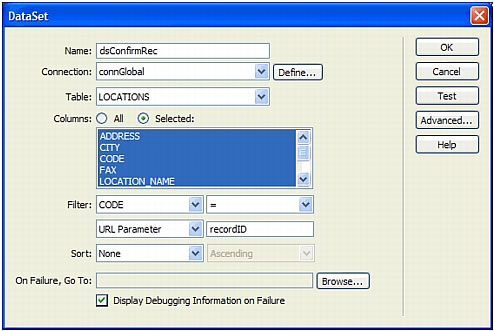
- Complete the Filter section as follows to find and display the record specified in the URL parameter passed by the search page:
- From the first pop-up menu in the Filter area, select the column in the DataSet containing values that match the value of the URL parameter passed by the page with the Delete links. For example, if the URL parameter contains a record ID number, select the column containing record ID numbers. In the example discussed in the previous section, the DataSet column called CODE contains the values that match the value of the URL parameter passed by the page with the Delete links.
- From the pop-up menu beside the first menu, select the equal sign, if not already selected.
- From the third pop-up menu, select URL Parameter. The page with the Delete links uses a URL parameter to pass information to the confirmation page.
- In the fourth box, enter the name of the URL parameter passed by the page with the Delete links.
For example, if the URL used to open the confirmation page included the suffix locationDelete.aspx?recordID=CBR, then enter recordID.
The DataSet dialog box should look as follows.
- Click OK.
The DataSet appears in the Bindings panel.
To display the record the user wants to delete:
- Select the DataSet columns (record fields) in the Bindings panel and drag them to the confirmation page.
Make sure you insert this read-only dynamic content within the form boundaries. For more information on inserting dynamic content in pages, see Making text dynamic.
Next, you must bind the record ID column to the hidden form field.
- Make sure Invisible Elements are turned on (View > Visual Aids > Invisible Elements), then click the yellow shield icon representing the hidden form field.
The hidden form field is selected.
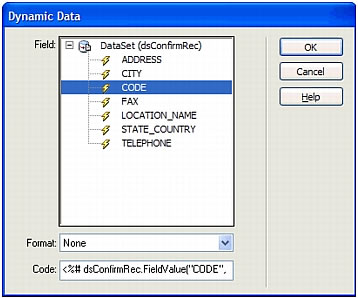
- In the Property inspector, click the lightning bolt icon beside the Value text box.
The Dynamic Data dialog box appears.
- In the Dynamic Data dialog box, select the record ID column in the DataSet and click OK.
In the following example, the record ID column selected is CODE.
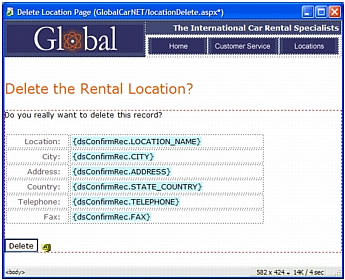
- Save the page.
The completed confirmation page should look as follows.
After creating a confirmation page, the next step is to add logic to delete the record. See Adding logic to delete the record (ASP.NET).
 |  |


