Define a remote folder
Define a remote folder
Now you’ll set up a remote folder so that you can publish your web pages. The remote folder often has the same name as the local folder because your remote site is usually an exact duplicate of your local site. That is, the files and subfolders that you post to your remote folder are copies of the files and subfolders that you create locally.
- On your remote server, create an empty folder inside the web root folder for the server.
Name the new empty folder cafe_townsend (the same name as your local root folder).
ABOUT...
Creating a remote folder with Dreamweaver If Dreamweaver is your only means of access to the remote server, you won’t be able to create an empty folder on the remote server until you’ve completed the remote settings in Dreamweaver and established a connection. If that’s the case, you can either define your host directory as your remote folder, or you can create a remote folder after you’ve established a connection with the server. In either case, continue with the instructions in this tutorial until you’re connected to a remote server. After you’ve established a connection, you can use the Dreamweaver Files panel to create a new remote folder.
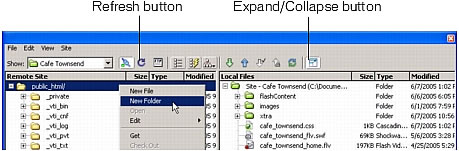
When you establish a connection with a remote server, the Files panel displays all of the files on the remote server in Remote view (just as it displays all of the local files on your computer in Local view). To display Remote view, select Remote view from the pop-up menu at the top of the Files panel, or click Expand/Collapse in the Files panel toolbar. When you click Expand/Collapse, the Files panel displays both Local view and Remote view simultaneously.
To add an empty folder in Remote view, first display Remote view using one of the methods described earlier. (If you don’t see your connection initially, click Refresh in the Files panel toolbar.) After you see that you’re connected to your web server, right-click (Windows) or Control-click (Macintosh) in Remote view and select New Folder.
For more information, see Managing Your Files in Using Dreamweaver.
- In Dreamweaver, select Site > Manage Sites.
- In the Manage Sites dialog box, select the Cafe Townsend site.
If you did not define the Cafe Townsend site, create a local folder for the site before you proceed. For more information, see Tutorial: Setting Up Your Site and Project Files.
- Click Edit.
- In the Site Definition dialog box, click the Advanced tab if the Advanced settings aren’t showing.
- Select Remote Info from the Category list on the left.
- Select an Access option.
The most common methods for connecting to a server on the Internet are FTP and SFTP; the most common method for connecting to a server on your intranet, or to your local computer if you’re using that as a web server, is Local/Network. If you aren’t sure what to select, ask the server’s system administrator.
For more information, click Help in the dialog box.
- If you selected FTP, enter the following options:
- Enter the host name of the server (such as ftp.macromedia.com).
- In the Host directory text box, enter the path on the server from the FTP root folder to the remote site’s root folder (cafe_townsend). If you’re not sure of the path, consult your system administrator.
In many cases, this text box should be left blank.
- Enter your user name and password in the appropriate text boxes.
- If your server supports SFTP, select the Use Secure FTP (SFTP) option.
- Click Test to test your connection.
- If the connection is unsuccessful, consult your system administrator.
For more information, click Help in the dialog box.
- If you selected Local/Network, click the folder icon next to the text box and browse to the remote site’s root folder.
For more information, click Help in the dialog box.
- Click OK.
Dreamweaver creates a connection to the remote folder.
- Click Done to close the Manage Sites dialog box.
 |  |


