Insert tables
Insert tables
Next you’ll add a table that will hold text, graphics, and Macromedia Flash assets.
- Click once on the page to place the insertion point in the upper-left corner of the page.

- Select Insert > Table.
- In the Insert Table dialog box, do the following:
- Enter 3 in the Rows text box.
- Enter 1 in the Columns text box.
- Enter 700 in the Table Width text box.
- Select Pixels from the Table Width pop-up menu.
- Enter 0 in the Border Thickness text box.
- Enter 0 in the Cell Padding text box.
- Enter 0 in the Cell Spacing text box.
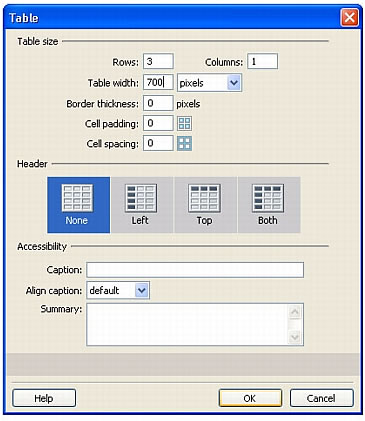
- Click OK.
A table with three rows and one column appears in your document. The table is 700 pixels wide with no border, cell padding, or cell spacing.

ABOUT...
More about tables Tables are a powerful tool for presenting tabular data and for laying out text and graphics on an HTML page. A table consists of one or more rows; each row consists of one or more cells. When you create multiple rows with multiple cells, the cells form columns. Technically, a cell is a division within a horizontal row, and a column is the vertical accumulation of those cell divisions.
Dreamweaver displays the table width and the width for each table column in the Table selector (indicated by green lines) when the table is selected or when the insertion point is in the table.

Next to the widths are arrows for the table header menu and the column header menus. You can use the menus for quick access to common table-related commands. You can also enable or disable the display of the widths and menus by selecting View > Visual Aids > Table Widths.
Tables can have borders, and the cells of a table can have padding, spacing, or both. Cell padding refers to the number of pixels between the cell’s content and the cell’s boundaries. Cell spacing refers to the number of pixels between adjacent table cells.
If you don’t explicitly assign values for cell padding and cell spacing, most browsers display the table as if cell padding were set to 1 and cell spacing were set to 2. If you want to ensure that browsers display the table with no padding or spacing, set cell padding and cell spacing to 0.
For more information about tables, see Presenting Content with Tables in Using Dreamweaver.
- Click once to the right of the table to deselect it.
- Select Insert > Table to insert another table.
- In the Insert Table dialog box, do the following for the second table:
- Enter 1 in the Rows text box.
- Enter 3 in the Columns text box.
- Enter 700 in the Table Width text box.
- Select Pixels from the Table Width pop-up menu.
- Enter 0 in the Border Thickness text box.
- Enter 0 in the Cell Padding text box.
- Enter 0 in the Cell Spacing text box.
- Click OK.
A second table with one row and three columns appears below your first table.

- Click to the right of the table to deselect it.
- Insert a third table by selecting Insert > Table and entering the following values in the Insert Table dialog box:
- Enter 1 in the Rows text box.
- Enter 1 in the Columns text box.
- Enter 700 in the Table Width text box.
- Select Pixels from the Table Width pop-up menu.
- Enter 0 in the Border Thickness text box.
- Enter 0 in the Cell Padding text box.
- Enter 0 in the Cell Spacing text box.
- Click OK.
A third table, with one row and one column, appears below your second table.

Click to the right of the table to deselect it. Your page should now look as follows:

NOTE
You may see the Table selector (indicated by green lines) after you insert a table. You can always make the Table selector disappear by clicking outside the table. You can also disable the Table selector by selecting View > Visual Aids > Table Widths.
 |  |


