Creating a web photo album
Creating a web photo album
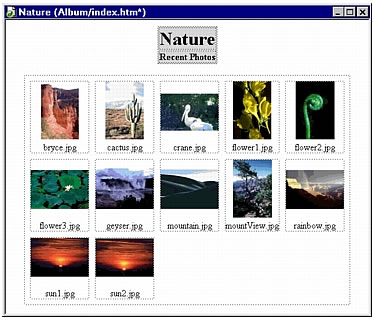
You can automatically generate a website that showcases a photo album of images located in a given folder. Dreamweaver uses Fireworks to create a thumbnail image and a larger-sized image for each of the images in the folder. Dreamweaver then creates a web page containing all the thumbnails, as well as links to the larger images. To create a web photo album, you must have both Dreamweaver and Fireworks 4 or later installed on your system.
Before you begin, place all of the images for your photo album in a single folder. (The folder is not required to be in a site.) In addition, make sure that the image filenames have any of the following extensions: .gif, .jpg, .jpeg, .png, .psd, .tif, or .tiff. Images with unrecognized file extensions are not included in the photo album.
To create a web photo album:
- In Dreamweaver, select Commands > Create Web Photo Album.
- In the Photo Album Title text box, enter a title. The title will be displayed in a gray rectangle at the top of the page containing the thumbnails.
If desired, you can enter up to two lines of additional text to appear directly beneath the title, in the Subheading Info and Other Info text boxes.
- Select the folder containing source images by clicking the Browse button next to the Source Images Folder text box. Then select (or create) a destination folder in which to place all the exported images and HTML files by clicking the Browse button next to the Destination Folder text box.
The destination folder should not already contain a photo album--if it does, and if any new images have the same names as previously used images, you might overwrite existing thumbnail and image files.
- Specify display options for the thumbnail images:
- Select a size for the thumbnail images from the Thumbnail Size pop-up menu. Images are scaled proportionally to create thumbnails that fit within a square that has the indicated pixel dimensions.
- To display the filename of each original image below the corresponding thumbnail, select Show Filenames.
- Enter the number of columns for the table that displays the thumbnails.
- Select a format for the thumbnail images from the Thumbnail Format pop-up menu:
GIF WebSnap 128 creates GIF thumbnails that use a web adaptive palette of up to 128 colors.
GIF WebSnap 256 creates GIF thumbnails that use a web adaptive palette of up to 256 colors.
JPEG--Better Quality creates JPEG thumbnails with relatively higher quality and larger file sizes.
JPEG--Smaller File creates JPEG thumbnails with relatively lower quality and smaller file sizes.
- Select a format for the large-size images from the Photo Format pop-up menu. A large-size image of the specified format is created for each of your original images. You may specify a format for the large-size images that differs from the format you specified for the thumbnails.
NOTE
The Create Web Photo Album command does not let you use your original image files as the large-size images, because original image formats other than GIF and JPEG might not display properly on all browsers. Note that if your original images are JPEG files, the large-size images generated may have larger file sizes or lower quality than the original files.
- Select a Scale percentage for the large-size images.
Setting Scale to 100% creates large-size images the same size as the originals. Note that the scale percentage is applied to all of the images; if your original images aren’t all the same size, scaling them by the same percentage may not produce the desired results.
- Select Create Navigation Page for Each Photo to create an individual web page for each source image, containing navigation links labeled Back, Home, and Next.
If you select this option, the thumbnails link to the navigation pages. If you don’t select this option, the thumbnails link directly to the large-size images.
- Click OK to create the HTML and image files for the web photo album.
Fireworks starts (if it’s not already running), and creates the thumbnails and large-size images. This may take several minutes if you’ve included a large number of image files. When the processing is complete, Dreamweaver becomes active again, and creates the page containing the thumbnails.
- When a dialog box appears that says "Album Created," click OK.
You may have to wait a few seconds for your photo album page to appear. The thumbnails are shown in alphabetical order by filename.
NOTE
Clicking the Cancel button in the Dreamweaver dialog box after processing has begun does not stop the process of creating the photo album; it merely prevents Dreamweaver from displaying the main photo album page.
 |  |


