Using reports to test your site
Using reports to test your site
You can run site reports on workflow or HTML attributes, including accessibility, for the current document, selected files, or the entire site.
Workflow reports can improve collaboration among members of a web team. You can run workflow reports that display who has checked out a file, which files have Design Notes associated with them, and which files have been modified recently. You can further refine Design Note reports by specifying name/value parameters.
NOTE |
|
You must have a remote site connection defined to run the workflow reports. To define a remote site, see Setting up a remote folder. |
HTML reports enable you to compile and generate reports for several HTML attributes. You can check combinable nested font tags, accessibility, missing Alt text, redundant nested tags, removable empty tags, and untitled documents.
After you run a report, you can save it as an XML file, then import it into a template instance or a database or spreadsheet and print it, or display it on a website.
NOTE |
|
You can also add different report types to Dreamweaver through the Macromedia Dreamweaver Exchange website (see Adding extensions to Dreamweaver). |
To use the Reports command to check links in your site, see Checking for broken, external, and orphaned links.
To run reports to test a site:
- Select Site > Reports.
TIP
If you want to run only an accessibility report for your site, you can select File > Check Page > Check Accessibility and the report appears in the Site Reports panel of the Results panel group.
The Reports dialog box appears.
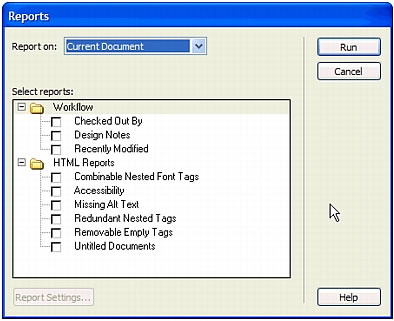
- Select a category to report on and a report type to run.
For more information, see Setting Reports dialog box options.
- Click Run to create the report.
Depending on the type of report you run, you might be prompted to save your file, define your site, or select a folder (if you haven’t already done so).
A list of results appears in the Site Reports panel (in the Results panel group).
To use and save a report:
- Run a report (see the previous procedure).
- In the Site Reports panel, do any of the following to view the report:
- Click the column heading you want to sort results by.
You can sort by filename, line number, or description. You can also run several different reports and keep the different reports open.
- Select any line in the report, then click the More Info button on the left side of the Site Reports panel for an description of the problem.
The information appears in the Reference panel.
- Double-click any line in the report to view the corresponding code in the Document window.
NOTE
If you are in Design view, Dreamweaver changes the display to split view to show the reported problem in code.
- Click the column heading you want to sort results by.
- Click Save Report to save the report.
When you save a report, you can import it into an existing template file. You can then import the file into a database or spreadsheet and print it, or use the file to display the report on a website.
TIP
After running HTML reports, use the Clean Up HTML command to correct any HTML errors the reports listed (see Cleaning up your code).
Related topics
- Reports in Dreamweaver
 |  |


