Opening a detail page and passing a record ID (ASP.NET)
Opening a detail page and passing a record ID (ASP.NET)
After adding a DataGrid to the master page (see Creating the master page (ASP.NET)), you must create links that open the detail page and pass the ID of the record that the user selected. The detail page will use this ID to find the requested record in the database and display it.
The record ID is passed to the detail page in a URL parameter. For more information, see URL parameters.
In a DataGrid, you create these links by turning a column in the DataGrid into a hyperlink column and setting its attributes, as described in this section.
To open the detail page and pass a URL parameter that contains the ID of the record the user clicked:
- Open the DataGrid dialog box you created in the previous section.
To open the dialog box, double-click your DataGrid in the Server Behaviors panel (Window > Server Behaviors).
The DataGrid dialog box opens.
- In the Columns box, select the column you want to apply links to.
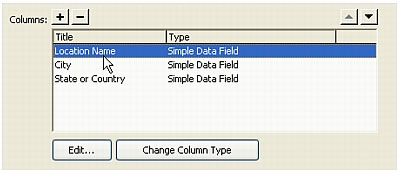
- Click the Change Column Type button and select Hyperlink from the pop-up menu.
The Hyperlink Column dialog box appears.

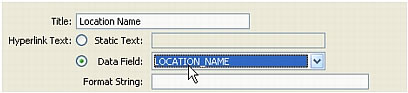
- In the Hyperlink Text area, specify the text to be displayed in the hyperlink column.
If you want to create a generic link such as Details for each row in the DataGrid, select the Static Text option and enter the text for the link. Each row in the DataGrid will display the same text (such as Details) in the hyperlink column.
If you want to add links to data displayed in the column, select the Data Field option and select a data field in your DataSet. The data field provides the text for the links in your hyperlink column. In the following example, each row in the DataGrid will display a location name.
- In the Linked Page area, build the URL to apply to the text in the hyperlink column.
The URL not only has to open the detail page, it must uniquely identify the record to display on that page.
To identify the record to display on the detail page, select the Data Field option and select a field in your DataSet that uniquely identifies each record. In most cases, the field will consist of a record ID number. In the following example, the field consists of unique location codes.

- In the Format String text box in the Linked Page area, click the Browse button then locate and select your detail page.
Dreamweaver creates a URL to the detail page that includes a URL parameter identifying the record the detail page should display. Make a note of the name of the URL parameter because you’ll use it in the detail page later.
For example, if you select locationDetail.aspx as your detail page, Dreamweaver creates the following URL:

In this case, Dreamweaver creates a URL parameter called
CODE. Dreamweaver copies the name of the data field, but you don’t have to use that name. You can change it to something more descriptive, such as recordID, as in the following example.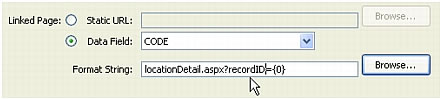
The
{0}element is a placeholder corresponding to the data field’s value. When the page runs, the values of the DataSet’s CODE field are inserted in the corresponding rows in the DataGrid. For example, if the Canberra, Australia, rental location has the code CBR, then the following URL will be used in the Canberra row in the DataGrid:locationDetail.aspx?recordID=CBR
- Click OK to close the Hyperlink dialog box; then click OK to close the DataGrid dialog box.
Dreamweaver updates the DataGrid on your page.
The next step in creating master/detail pages is to modify the detail page so that it can find the requested record in the database and display it on the page. See Finding and displaying the requested record on the detail page (ASP.NET).
 |  |


