Add a Record Insertion Form application object
Add a Record Insertion Form application object
You can use a Record Insertion Form application object to create a form that allows visitors to enter data into a database. The application object lets you select which fields to include in the form, label the fields, and select the types of form objects to insert. When a user enters data in the form fields and clicks the submit button, a new record is inserted in a database. You can also set a page to open after a record has successfully been submitted so that the submitter knows that the database was updated.
- In the Files panel, locate the file named "send" and double-click the file to open it.
The document opens in the Document window.
- Place the insertion point in the empty table row below the row that contains the paragraph.
The application object is inserted in the empty row.
- To add a record insertion object to your page, do one of the following:
- In the Insert bar’s Application category, select Record Insertion Form Wizard from the Insert Record pop-up menu.

- Select Insert > Application Objects > Insert Record > Record Insertion Form Wizard.
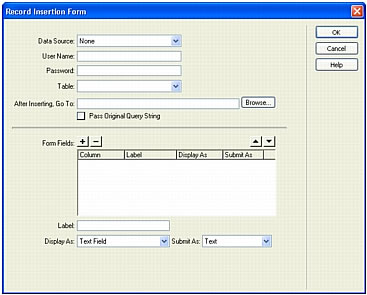
The Record Insertion Form dialog box appears.
- In the Insert bar’s Application category, select Record Insertion Form Wizard from the Insert Record pop-up menu.
- In the Data Source (ColdFusion) or Connection pop-up menu, select connTownsend.
- If a user name and password are associated with the data source or connection, enter them.
If you didn’t provide a user name or password when you set up the data source or connection, leave these boxes blank.
- In the Table pop-up menu, make sure COMMENTS is selected.
- Click Browse next to the After Inserting, Go To text box or (for ASP.NET) next to the On Success, Go To text box.
- In the dialog box that appears, select the file named "view" and click OK to close the dialog box.
For testing purposes, you want to see the page that displays all of the comments after you enter a comment. After testing the web application, change this setting to show a page that thanks the visitor for the comment.
- Complete the rest of the wizard by following the procedure in the next section.
- Complete the rest of the wizard by following the procedure in Create the insert form.
 |  |


