Copying dependent files
Copying dependent files
Some dynamic pages rely on other files to work properly. You must upload all related files, including server-side includes and dependent files such as image files and JSP class files, to the folder you defined for processing dynamic pages (see Specifying where dynamic pages can be processed). Dreamweaver does not automatically copy dependent files to the folder when you enable Live Data in Design view.
NOTE |
|
Live Data supports code in server-side includes and application files such as global.asa (ASP) and application.cfm (ColdFusion). Make sure to upload these files to the server before turning on Live Data. |
To copy dependent files to the application server:
- Open the Site panel (Window > Site Files) and click the Expand button (the last icon on the panel toolbar).
The Site panel expands to full size.
- Click the Application Server icon on the expanded Site panel toolbar (the second icon from the left).
The application server’s root folder appears under Remote Site.
- Under Local Folder, select the dependent files.
- Click the blue up arrow in the toolbar to copy the files to the application server, or drag the files to the appropriate folder under Remote Site.
You need to do this only once for your site unless you add more dependent files, in which case you must copy them to the folder too.
Related topics
- Viewing live data in Design view
- Requirements for displaying live data
- Providing the page with expected parameters
- Refreshing the page
- Troubleshooting Live Data view
Providing the page with expected parameters
To generate dynamic content, some pages require parameters from the user--for example, a page needs the ID number of a record to find and display that record. Without that data, Dreamweaver cannot generate dynamic content to display in Design view.
If a page expects parameters from the user, you must provide the parameters as follows.
To provide the page with data expected from users:
- In the Document window, select Live Data Settings from the View menu.
The Live Data Settings dialog box appears.
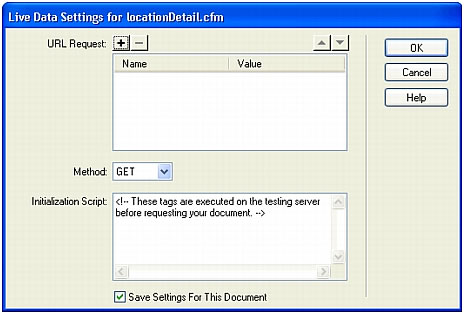
- Complete the dialog box and click OK.
For more information, see Setting the Live Data Settings dialog box options.
If you specified the GET method in the Live Data Settings dialog box, a text box appears on the Design view toolbar. Use this text box to enter different URL parameters; then click the Refresh button (the circle-arrow icon) to see how the parameters affect the page.
Enter each URL parameter in the following format:
name=value;
In this format, name is the URL parameter name expected by your page and value is the value held by that parameter. For more information, see URL parameters.
Related topics
- Viewing live data in Design view
- Requirements for displaying live data
- Copying dependent files
- Refreshing the page
- Troubleshooting Live Data view
 |  |


